This is the final blog post of the GSoC project ILWIS Mobile. The project has been introduced in this blogpost. The first period has been used to get acquainted with the tools and the programming languages and the second half to code the app.
The Gatherer app was a project of the Google Summer of Code 2014 hosted by 52°North. Rob Lemmens, Martin Schouwenburg and Bas Retsios ( ITC Enschede ) are members of 52°North’s ILWIS community and mentored this project.
The idea was born out of the need to extend ILWIS objects to a mobile platform. In the end it should be possible to use the functions of an ILWIS server from the mobile app. For this connection to be convenient, the app should be written in C++.
This app would be a first step in that direction. The starting point was to make it possible to digitize geographical points and connect information to it, thus making it possible to collect certain observations at a specific position and store them on a remote server. For this there were two preconditions; it should be possible to make and save an observation without internet connection (and then upload it later), and it should be possible to easily (down)load another template for different kind of observation. The initial templates in mind were landuse mapping, health mapping (cholera), health mapping (tuberculosis) and water point mapping.
The Android app we developed enables the user to download a template (including basemap and historical observations), make one or more observations with that template and show the basemap of the template with the historical observations as markers on it plus his/her current location. He/she can also upload the saved observations to a server. A screencast demonstrating the app is available on youtube. I will go through the functions of the app step by step.
Functions
Figure 1 shows the app’s main menu. This is the starting point for downloading a template, selecting a template or uploading an observation. Before the user can begin collecting an observation, he/she must enter the server address, where the templates and observations are stored, and an observer name in the ‘Settings’ option (Figure 2) found in the top menu.
Figure 1: Main Menu Figure 2: Settings
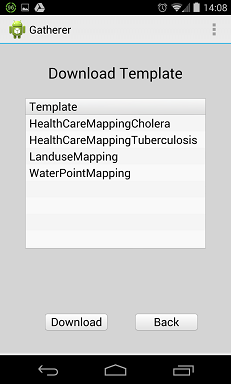
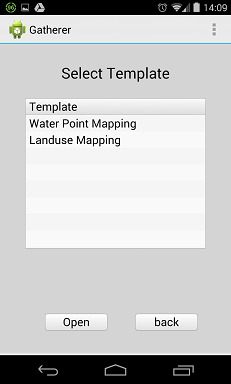
The user first downloads a template via the ‘Download Template’ button. The screen that appears is shown in Figure 3. The app automatically requests the server to provide the names of the templates available, in this case there are four different templates. With a click, the app downloads the selected template complete with metadata. If the metadata indicates there is a basemap available, the user is asked if he/she would like to download it. The same happens for historical observations. Now that a template is downloaded to the app, the user selects it via the ‘Select Template’ button. A list of all the downloaded templates appears (Figure 4), in this example there are two. With a click on the ‘Open’ button, the template is displayed and the user can make an observation.
Figure 3: Download Template Figure 4: Select Template
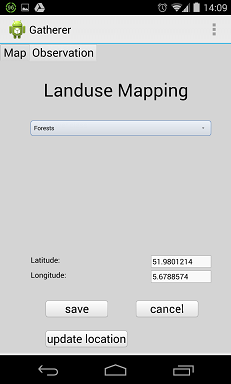
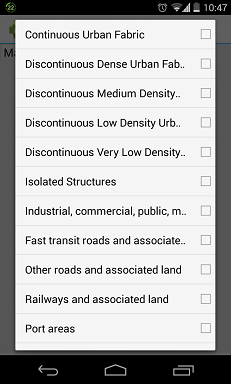
When a basemap has been downloaded the template screen displays two tabs: ‘Observation’ and ‘Map’. The user records and saves a new observation with the ‘Observation’ tab (Figure 5). The template selected determines what is considered an “observation”. Each template provides a different set of fields. In the case of Figure 5 a drop down list is available. The user’s location is automatically read from the GPS, but can also be filled in by hand. With the button ‘save’, the observation is saved and ready to upload. Figure 6 shows the ‘Map’ tab with a pannable and zoomable version of the basemap. It is also possible to display historical observations, filtered by date or not. The current location (of the GPS) is also shown (not on the screenshot). A marker in green shows where there is an historical observation. Newly saved (but not yet uploaded) observations are shown in blue (not on the screenshot). When a marker is tapped a popup with the observation details appears.
Figure 5: Record an observation with checkbox menu

Figure 6: The ‘Map’ tab
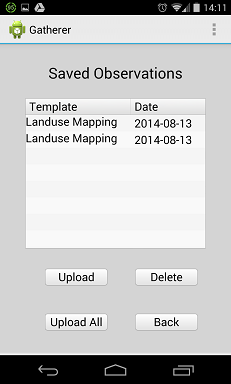
With a click on the ‘Saved observations’ button from the main menu (Figure 1), a list of the saved observation appears (Figure 7). The user can choose to upload all observations at once with the ‘‘Upload All’ button or select individual observations for ‘Upload’ or ‘Delete’.
Figure 7: Saved Observations
Architecture
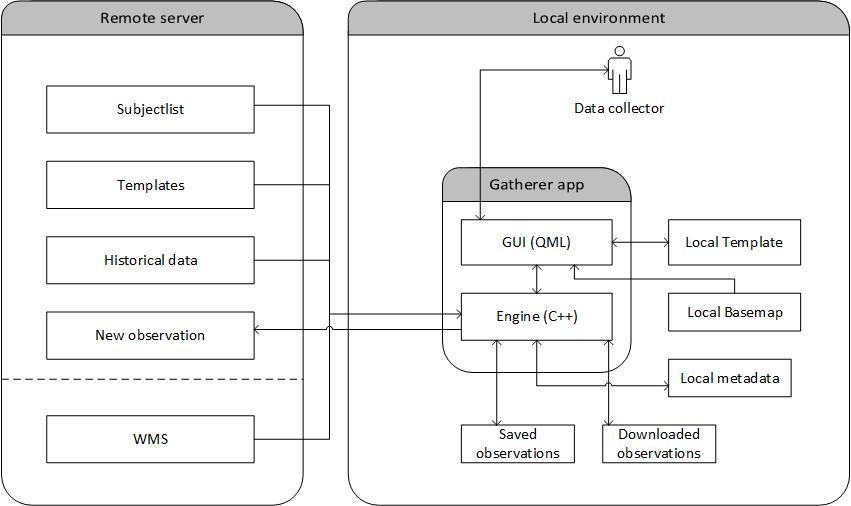
The app is programmed using QT 5.3.1. It is coded in C++ and QML. QML is used for the gui and C++ for the logic, the connection with the remote server and local files, etc. Please find more on this in my previous post. Altogether the architecture of the app looks like this (Figure 8):
Figure 8: Gatherer Architecture
The template server provides four different possible actions.
- The user can request a Subjectlist, which is a list of the available templates, shown in figure 3.
- The user can download a Template. Once downloaded, it is split up in a metadata part, saved as .gatherer, and a qml part, saved as .qml.
- The user can request Historical data, which is saved as .xml.
- The user can insert a New observation, which is used in Figure 7.
When there is a basemap, the the app downloads a static image from the WMS server and saves it as a .png file. This is done according to the resolution and projection provided by the metadata. The current version of the gatherer application does not transform coordinates. In order to overlay correctly with the GPS and the observation markers, the WMS server is requested to provide the PNG image in LatLon WGS 1984 geometry.
The saved observations are stored in a .txt file as strings.
Future ideas
For the most part, all the goals for this project were reached, but while working on them some extra ideas on how to improve the current functions popped up. Some ideas for future development of the Gatherer are:
- Make it possible to show single markers for templates with more than one field.
- Add a ‘go to my location’ button that pans to the current gps location.
- Make it possible to select the location of a new observation via the map (with a cross hair or just a tap).
- Include an option to use a bigger basemap as WMS or even a Google Maps or OSM layer.
Downloaded the code from GitHub.
At the beginning of this period I knew little about QT, C++, QML and JavaScript. My previous programming experience was in Python and Java. That made it a real challenge for me, but also was a big chance to further develop my software skills. In the first part I had to put more time in to browsing the internet for answers. After a while I was able to implement more and more functions quicker each time and I eventually met all the goals, proving that I was able to do a lot with these languages after all. I am very thankful for my mentors from ITC, Martin Schouwenburg, Bas Retsios and Rob Lemmens, who helped me through it. Also thanks to 52°North for hosting this project and Google for organizing the Google Summer of Code 2014!


Leave a Reply